
Less Hands-On-Time! More Streamlined Process!
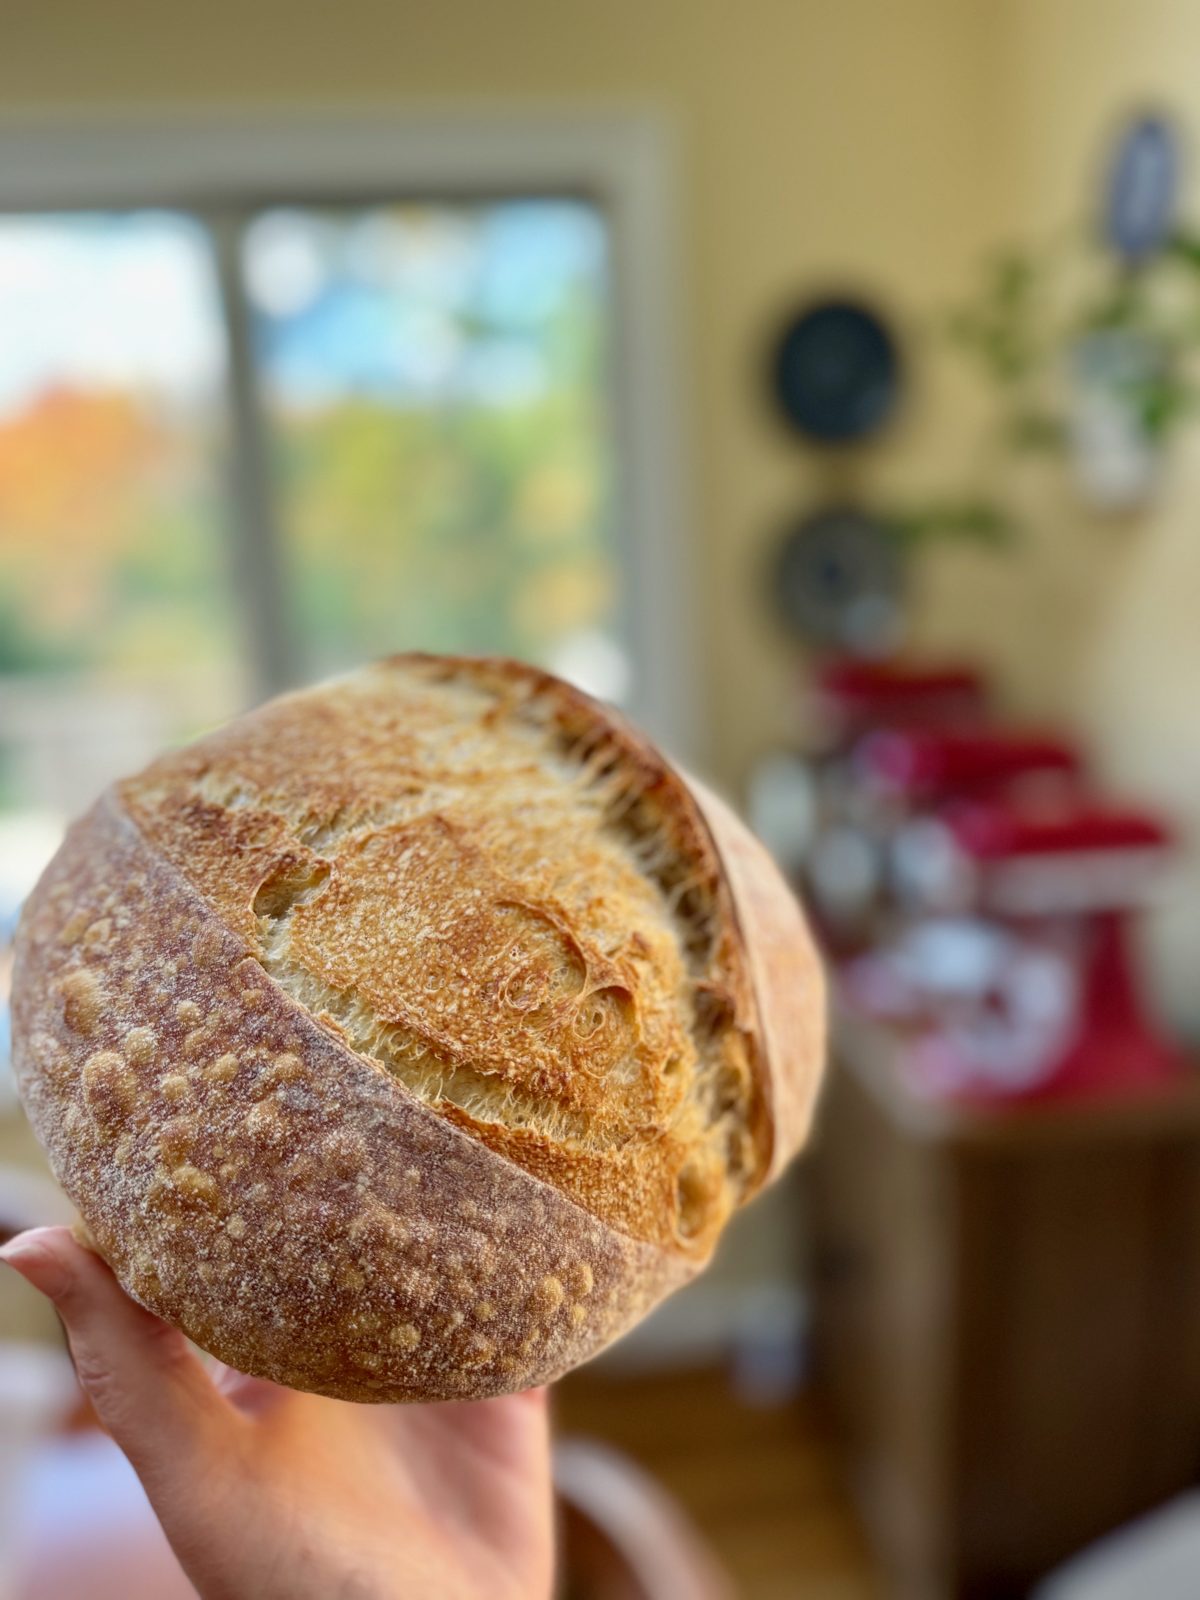
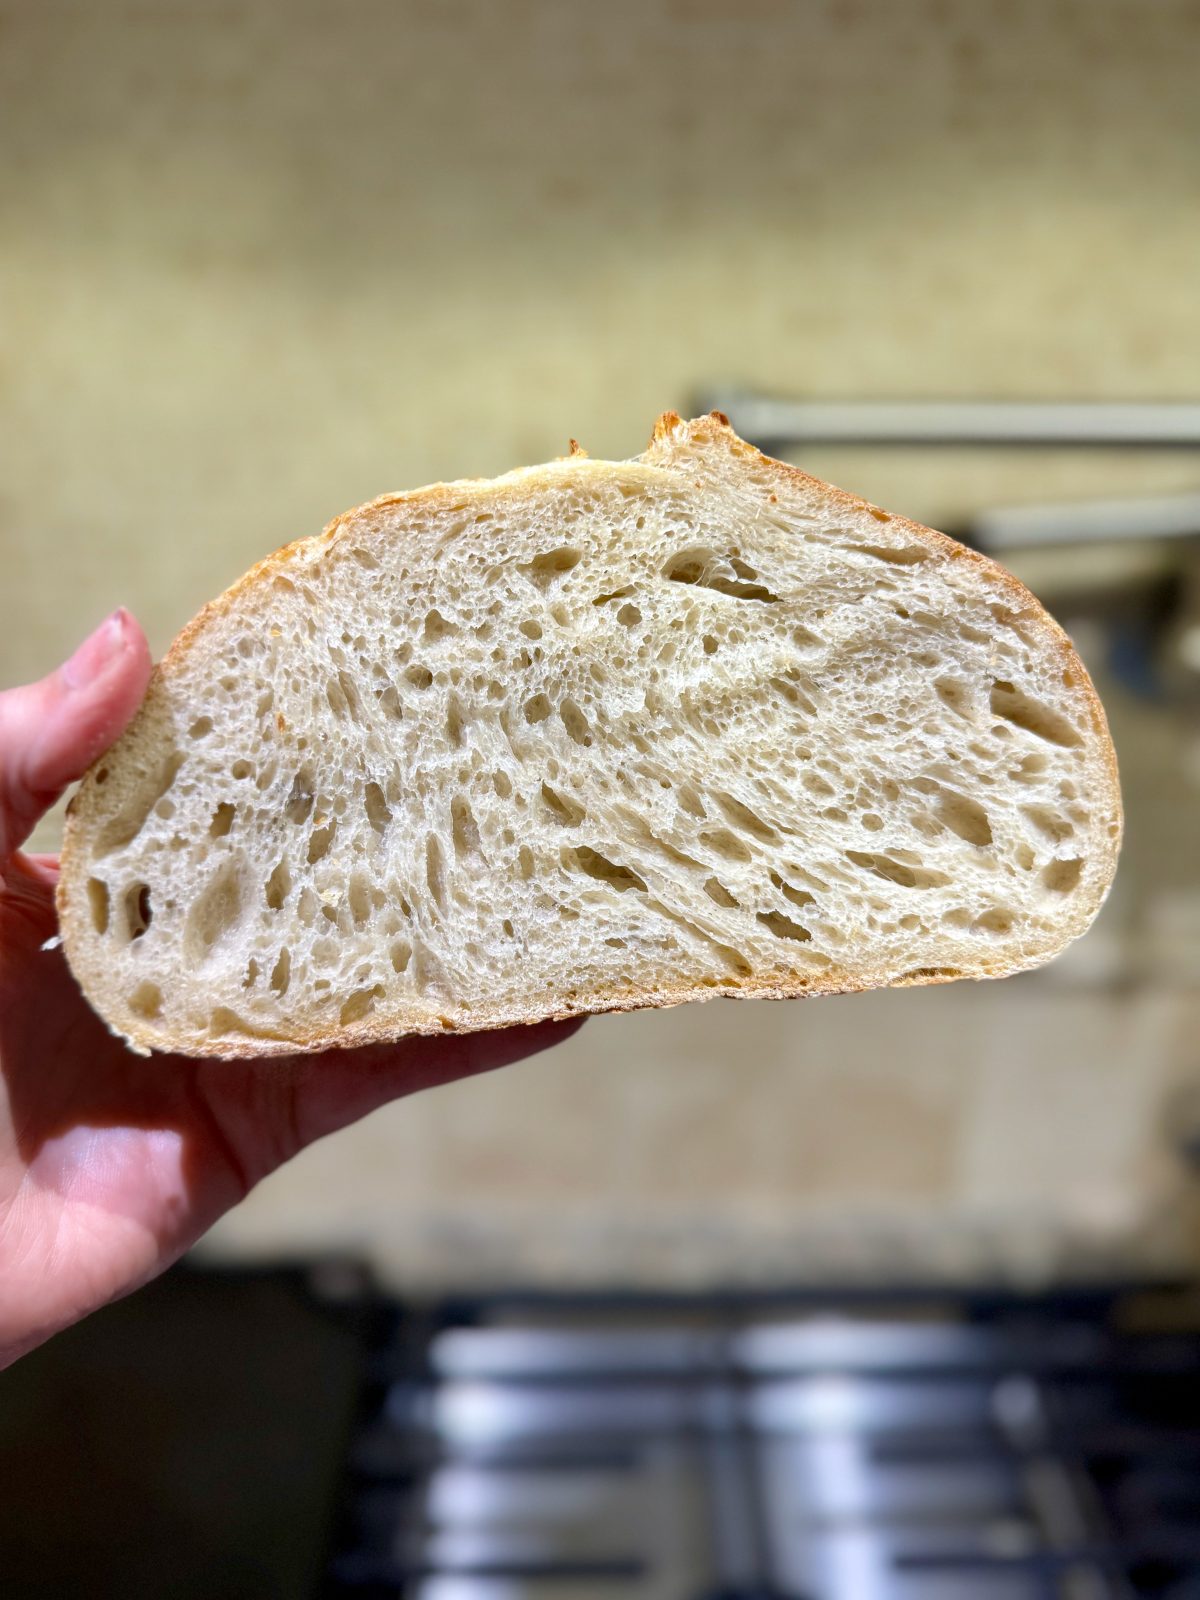
Stand Mixer Sourdough Bread is a delicious homemade sourdough bread – made easier with the use of your stand mixer! The process is more accessible and streamlined! It bakes up with a crispy, crackly crust and chewy, fluffy interior – It has that lovely sourdough flavor and is absolutely scrumptious with butter, toasted and in sandwiches! This recipe makes a 1.5 pound boule shaped sourdough loaf.
Beginners: Don’t panic that the Stand Mixer Sourdough Bread instructions seem long, once you make it a couple times you won’t even need the recipe. Make sure to check out my detailed YouTube video that goes through the whole process step-by-step. Linked here and below.
What is Sourdough?
- Sourdough bread is known for its tangy flavor, chewy texture, and crisp, crackly crust.
- It is a naturally leavened bread, which in its purest form, uses a starter of wild yeast and good bacteria rather than commercial yeast.
- People have been making sourdough bread for thousands of years, It is the oldest type of leavened bread!
Why Sourdough?
From what I have read, sourdough can be a great nutritious bread choice for most people!
- Digestibility
- Lower Glycemic Index
- Nutrient Absorbtion
- Prebiotics & Probiotics
- Antioxidants
- It’s a Fermented Food!
- Plus many more! A quick internet search will give you tons of information!
Sourdough is a Learning Process:
For me, I had to read a lot of recipes and articles and watch a lot of videos. And of course make a lot of sourdough loaves, tweaking my process and recipe along the way. But even a not-perfect loaf of homemade sourdough is worth the effort and delicious – and something you will learn from!
I learned and am still learning from my mistakes! Hopefully my process will save you from some of those same errors!
Here are some of the sites & videos that were helpful for my Stand Mixer Sourdough Bread Journey:
King Arthur Baking: Helpful recipes/tips and some great sourdough making products
Pantry Mama Website: Great resource when you have questions about almost anything sourdough. She also has a newsletter you can subscribe to and a Facebook Group.
Grant Bakes: Another great website – I use his sourdough ingredient rations
The Bread Code: Shaping video was helpful – I use his 2nd shaping method in the video
FoodGeek: Process for par-baking the bread to freeze and finish baking later
Reddit/Sourdough Thread/Group: Helpful for questions – and this is where I found the baking method.
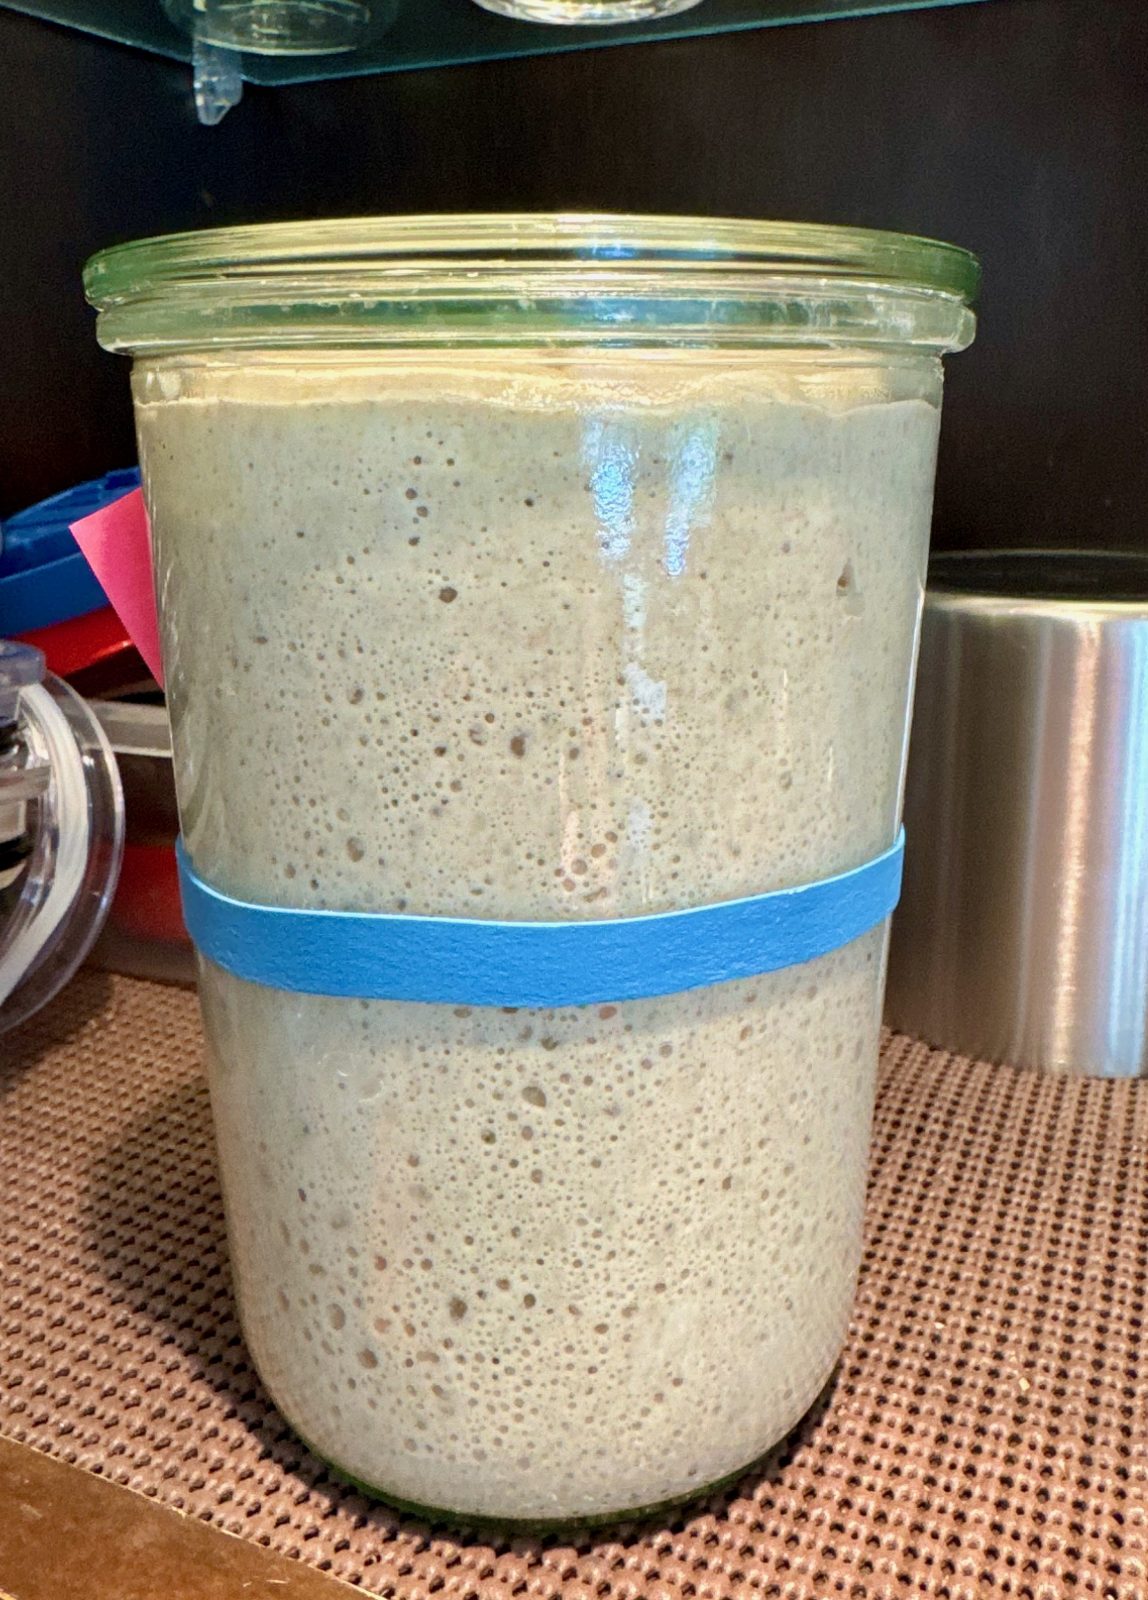
You’re Going to Need an Active Sourdough Starter:
A healthy and active sourdough stater is the basis of making sourdough! You can make it yourself, purchase a starter or have someone share some starter with you.
My sister-in-law Laura dried out some of her starter and mailed the flakes to me. I followed this method to revive the flakes and now my starter has been making some really great Stand Mixer Sourdough Bread!
You can read more about the basics of starter here. A quick internet search will pull up tons more starter information.
Stand Mixer Sourdough Bread – Step-by-Step – VIDEO:
I will take you step-by-step in real time through the process of making my Stand Mixer Sourdough Bread. The video is about 45 minutes long, but it’s divided into sections. You can navigate to each section with the links in the video caption. So you can watch whatever section you want.
Some other Bread Recipes:

Stand Mixer Sourdough Bread
Equipment
- stand mixer I have been using my KitchenAid Artisan 3.5qt Mini Stand Mixer
- flex edge or flat beater and dough hook
- scrapers, plastic and bench scraper
- digital kitchen scale
- straight sided container for bulk fermentation
- rubber bands and/or masking tape
- cast iron dutch oven
- really protective oven/mitts/gloves
- long thin spatula
- rounded container for cold fermentation – banneton basket or mixing bowl/colander lined with kitchen towel
- lame or kitchen scissors for slashing your dough before baking
- parchment paper
- baking sheet
- probe thermometer the kind where you leave a probe in the food and have a cable that connects to a monitor out side the oven.
Ingredients
- 100 grams active sourdough starter
- 275 grams water
- 450 grams bread flour, I use King Arthur plus extra for shaping
- 10 grams salt
- rice flour – used for proofing basket
Instructions
Mix: (Takes about 5 min.)
- Place stand mixer bowl on digital scale, set to grams and tare to zero. Measure 275 grams water. (room temperature water if possible). Tare to zero again and measure 100 grams of active sourdough starter. Use your flat or flex edge beater to mix water and starter together.
- Remove your mixer bowl and place back on digital scale. Tare to zero and add 450 grams bread flour and 10 grams salt. Put bowl back on stand mixer and mix with flat or flex edge beater until combined into a shaggy mass.
Autolyse: (30 min. hands-off time)
- Set timer for 30 min. to allow dough to rest, relax and absorb the water.
Knead: (10 min. hands-off time)
- Switch from flat/flex edge beater to dough hook. Knead on speed 2 for 10 minutes.
2 Sets Stretch & Fold: (5 min. active time, 30 min. hands-off time)
- Scrape dough out of bowl – either onto counter or in shallow container you plan to bulk ferment in. If dough is very sticky, use dampened hands and scraper.
- Scrape under the edge of the dough on one side.
- Use hand and scraper to stretch dough upwards.
- Fold the stretched part over the dough mound.
- Repeat the process on all sides of the dough mound. I usually perform 6 stretch and folds.
- -Allow dough to rest 30 minutes – loosely covered
- Repeat the same stretch and fold process. (6 more stretch and folds going around the dough mound.
- If dough is not already in straight sided bulk fermentation container, place it there now. Cover container loosely with lid or a kitchen towel. Find place to bulk ferment that keeps a constant temperature around 72 – 80 degrees F.
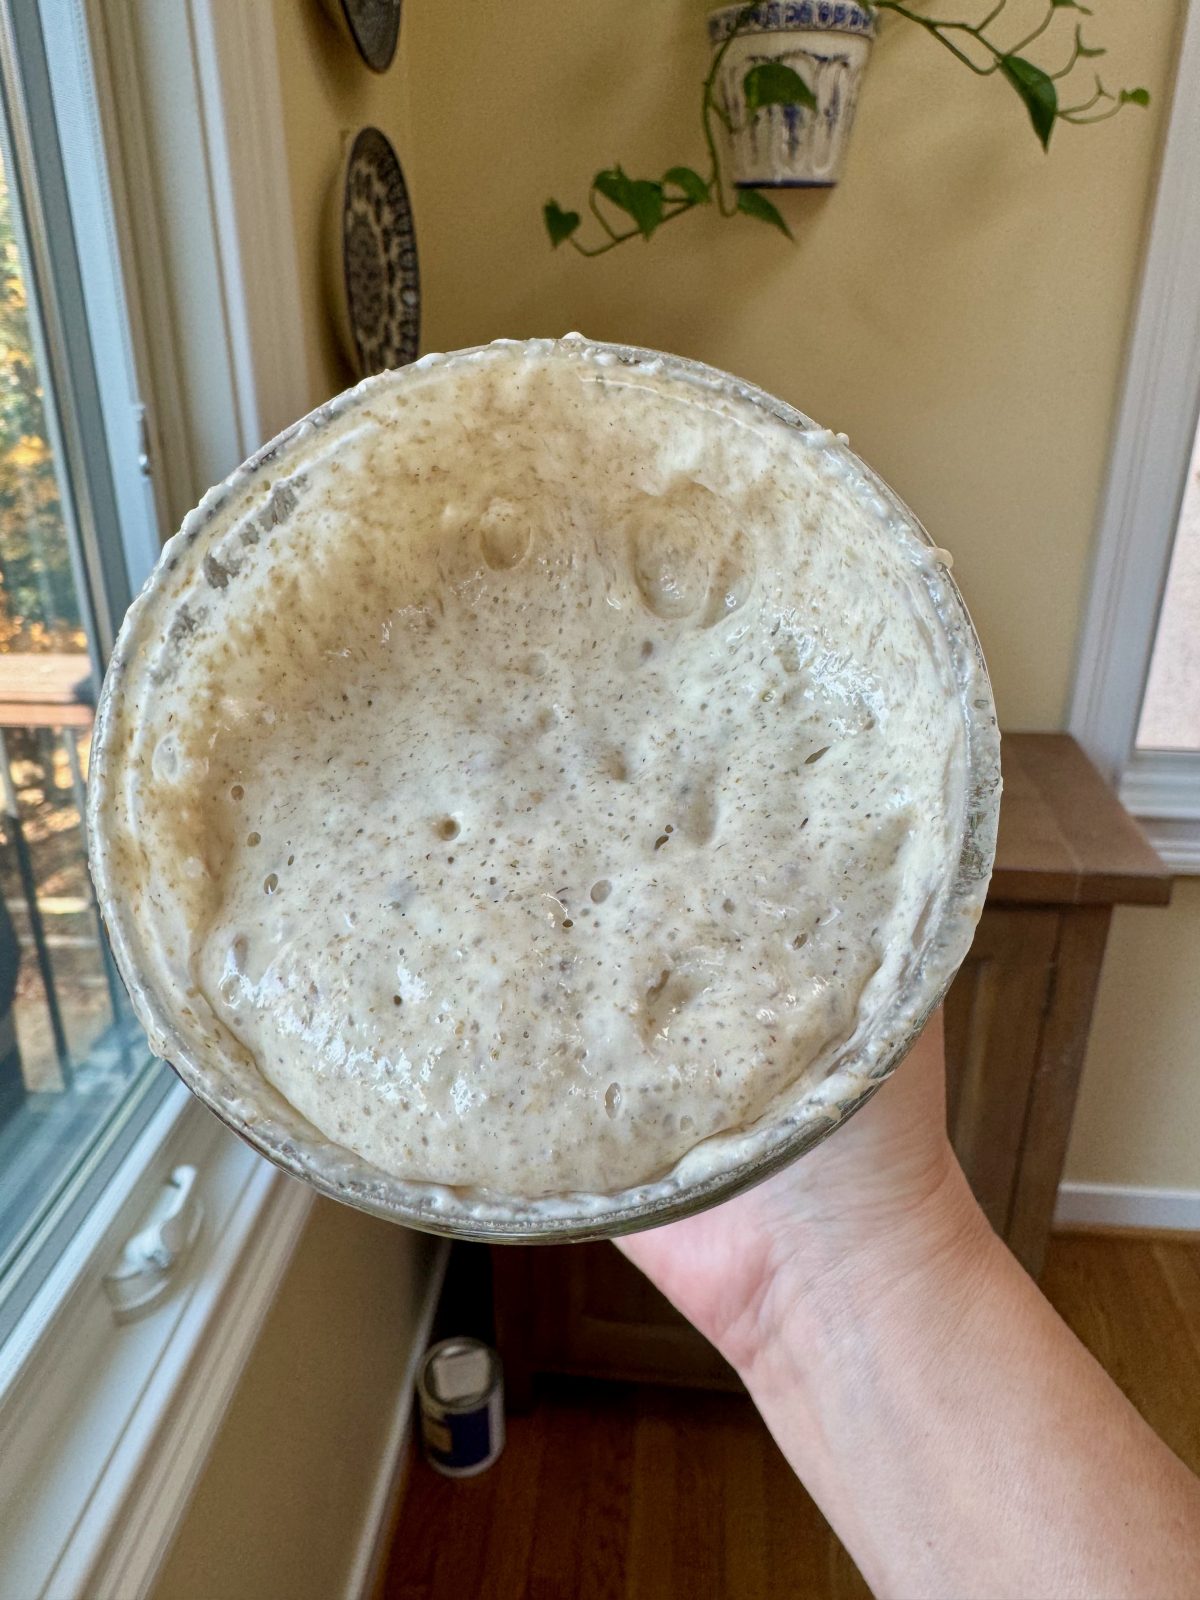
Bulk Fermentation or Rising: (4-8 hours hands-off time)
- Find place to bulk ferment that keeps a constant temperature around 72 – 80 degrees F. See notes below for suggestions.
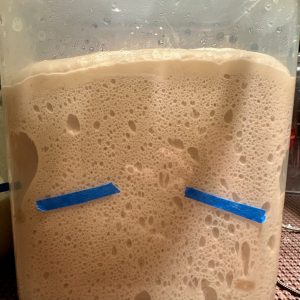
- Mark the level of the dough in the container with a rubber band, tape etc. So later you can tell when it has doubled in size.
- Allow to bulk ferment (rise) for 4-8 hours. Time will depend upon warmth of space, dough temperature etc. Mine usually takes 5-6 hours to double in size and get all jiggly & bubbly.
Preform: (2 min. active time, 15 min. hands-off time)
- You will know your dough has bulk fermented long enough when it is doubled in size, is not too sticky when you touch the top of it, jiggly when gently shaken and full of bubbles.
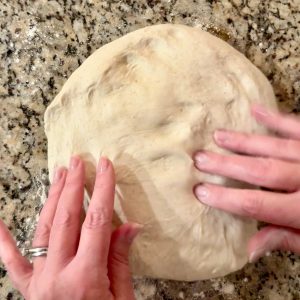
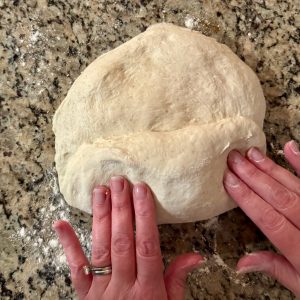
- Use scaper to turn dough out onto clean counter. Use dough scraper to scrape under edge of dough to do about 4-6 stretch and folds. Use dough scraper to turn entire dough mound over – seam side down onto counter.
- Allow to rest 15 minutes.
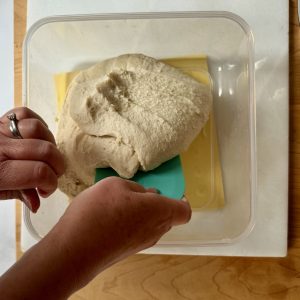
Form Loaf: (5 min. active time)
- Sprinkle counter with a little bit of bread or AP flour.
- Use dough scraper to turn dough onto flour seam side down.
- Use your fingers to gently, very slightly flatten and stretch dough. (about 10" across)
- Use dough scraper to fold the bottom third of dough over. Press gently to adhere together.
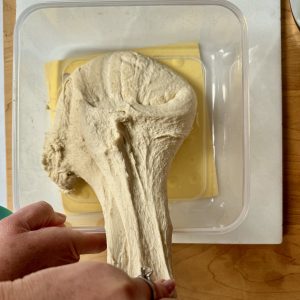
- Next, use dough scraper to fold in left and right side of dough, pressing gently to adhere. (it's kind of like swaddling a baby.)
- Now, use dough scraper to fold downwards from the two upper corners, pressing gently to adhere.
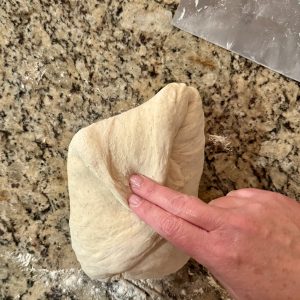
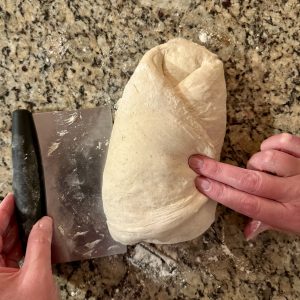
- Now "Stitch" the dough by pulling in and adhering from 2-3 places on each side to make more of a longer, narrower loaf shape.
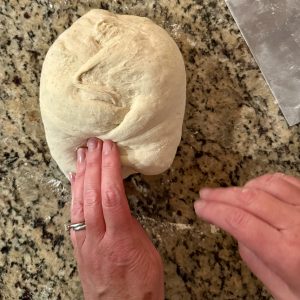
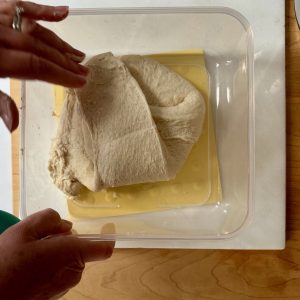
- Starting on the far side of the loaf, gently roll dough toward you using thumbs to press/fold dough.
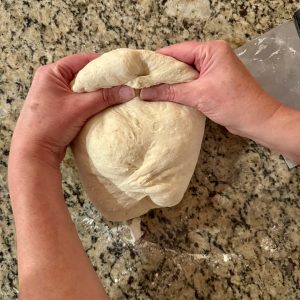
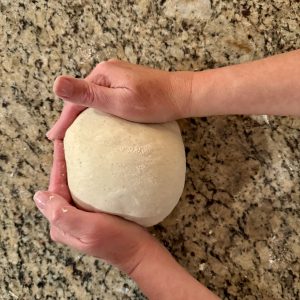
- Now you need to tuck the left and right sides under the roll. Use your hands to cup under loaf while turning in circle to form ball shape and tighten the loaf.
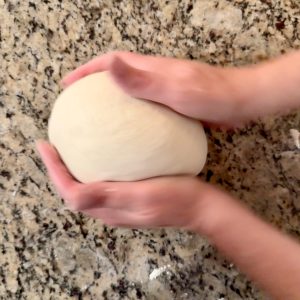
- Use both hands to drag loaf across counter surface to further tighten and create surface tension. Rotate loaf and repeat dragging action.
- Sprinkle cold-proofing basket/container with rice flour. Turn formed loaf, seam side up into basket. Loosely cover with kitchen towel.
Cold Fermentation: (12-48 hours hands-off time)
- Refrigerate dough in basket for 12-48 hours.
Bake: (10 min. active time / 1 hr. 40 min. hands-off time)
- Place empty dutch oven (with lid) in oven. A baking sheet on the rack below it. Preheat oven – 1 hour at 475 degrees F.
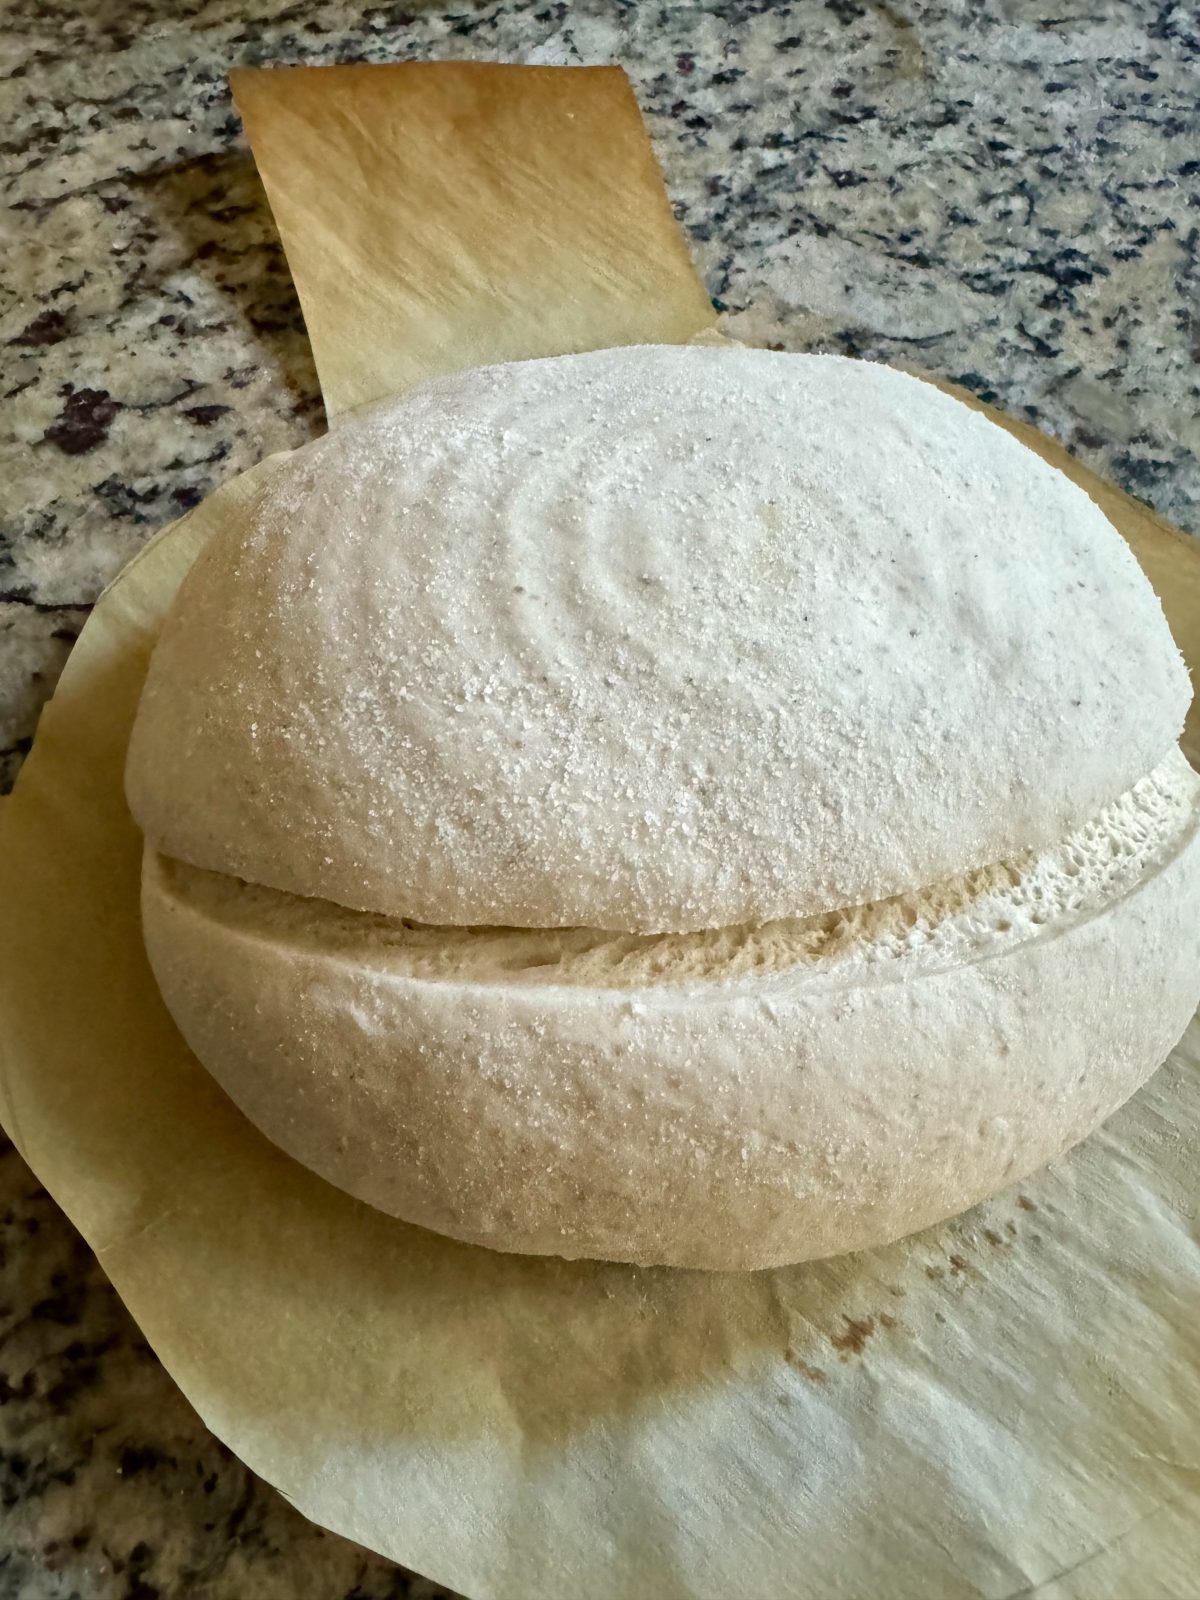
- While oven is preheating – cut a round of parchment about 10" in diameter – with "handles" on the side. You will use this to help lower/lift bread out of dutch oven.
- When oven has preheated for an hour. Remove loaf from refrigerator.
- Turn out of basket onto parchment, carefully with seam side down.
- Use lame or kitchen scissors to cut a slit across the loaf. Should be about 1/4 inch deep.
- Using really good oven gloves/mitts, carefully remove hot dutch oven from oven, close oven door, carefully remove hot lid, lower in cold loaf, return lid and place in oven. (I leave the parchment round in the dutch oven)
- Lower temperature to 450 degrees F. and bake covered for 20 minutes. Carefully remove lid and continue baking 10 minutes. (still at 450). Then, turn down to 425, insert probe thermometer (if you have one) and bake another 10-15 minutes until nicely browned or thermometer temp. reaches 212 degrees F.
Cool: (2 hours hands-off time)
- Carefully remove dutch oven, and removew loaf to cooling rack. Allow to cool 2-12 hours.
Love your recipes using the Kitchenaid stand mixer.
If we do not have a dutch oven, is there an option for baking?
Hi Carol – Here’s a technique you could try without a dutch oven.
Thank for taking the time to make the video. I have made 3 loafs of sour dough this week and each one has been better than the last. Trying it with 100 grams of wheat with 375 grams of bread flour. Again, thanks.
Love to hear it Dave!
I made this sourdough bread recipe using a stand mixer and it turned out great! Will definitely use it again! Thank you!
Can you tell me how many hours for step 11?
11 before going into cold fermentation? Right away for me, maybe Christina has another variable there.
Yes, after forming and putting into basket, I put right into the refrigerator as well.
Step 11 is the cold fermentation – I do 8 hours at the minimum (overnight in the refrigerator) or up to 3 nights in the refrigerator.
“ Sprinkle cold-proofing basket/container with rice flour. Turn formed loaf, seam side up into basket. Loosely cover with kitchen towelhours.”
I just wasn’t sure what towelhours meant 🙂
Thanks for catching my typo Heather! all fixed. (deleted the “hours”.)
Love your wonderful guided recipe! I would like to make two sourdough loaves at the same time. Can I put all these ingredients in the same KitchenAid glass mixer bowl or would this be too much for the mixer to handle?
Hi Diane – I usually make mine in my KitchenAid 3.5 qt Mini – if I wanted to try doubling the recipe, I’d switch to one of my larger capacity stand mixers – 5 or 7qt. Hope that helps!
Hi Tina. I found your channel totally by accident. I am going to try this recipe. I’ve made bread in the past but with mixed results. I love baking but it is alittle discouraging when you can’t duplicate results. Do you have a sourdough sandwich recipe? Or how to take your white sandwich bread and make it sourdough.
Some of your other recipes look delicious.. Cant wa8t to try them!!!
Thanks for reaching out Martin! We use my sourdough for sandwiches. It’s a mid-hydration bread that is still airy, but doesn’t have giant holes like the higher hydration sourdough recipes. Makes it easier to handle as well! Enjoy! and reach out with any questions!
Your Stand Mixer Soudough Bread recipe was my first successful sourdough Loaf! Have you ever double it!
Thank you so much!
Hi Rita! I haven’t doubled yet, I generally make one in one bowl and one in another bowl consecutively. But I think doubling should work!
Just made this recipe and it turned out great! I doubled it and they both turned out beautifully. This is probably my 6th time making sourdough and this was definitely the lightest crumb I’ve had so far!
I was hoping to make a loaf with some whole wheat flour. Do you have any recommendations for how I could adapt the recipe to have maybe 1/4 to 1/2 whole wheat?
Hi Kristy! I haven’t started playing with whole wheat yet, when I do, I’ll start with a small ratio. I would say 1/4. Let us know how you do!
I’m having some issues at the bulk fermentation part. My dough barely rises. There really isn’t a warm area in my house. I keep it 68 degrees because #menopause. LOL My starter doubles in size when I feed it before starting and it’s ooey & gooey & full of bubbles. But the bulk stage seems lack luster. My loaves seem to turn out fine though. Could you provide any thoughts? This weekend is only my 3rd loaf. Thank you so much!!!
I am making double batch. Are the time for knead and rest times the same?
Very pleased. This recipe/method gave me the correct consistency for shaping easily. Your pics and descriptions are “right-on.” Do you ever make a bigger loaf with using the mixer?
Fantastic recipe!
I follow this method religiously and all of my loaves turn out beautiful!
I’d love to know more about when would be the best time to add in fillings with this recipe, such as olives, as I know this is usually during the stretch and fold process when making by hand.
10/10
Hello Ell – That’s a really great question! I think you may need to add in a stretch and fold somewhere in the midst of the bulk fermentation time – as I think the dough needs to be elastic enough to be stretched out for the fillings to be added. I honestly haven’t tried to do this yet myself. I may need to research that a bit. Let me know if you try it yourself!
Hi Tina
Can I just divide the dough into two and bake them in loaf pans?
Hi Linda – Sorry for late response! I haven’t tried that myself, but you could certainly try!
I was hoping you would include a recipe for the sourdough starter. I need one which is gluten-free.
I do have links to traditional starter recipes in the post. Here’s a gluten free starter recipe. Here’s a gluten free sourdough bread recipe. All the best! Happy baking!
Hello, newbie here! Could this recipe be used with AP flour instead of bread flour? If so, would the measurements be the same.
I already had an all purpose flour starter so I took 100g of my starter, 100g of water, 75g of all purpose flour and 25g of rye flour to start. My question is when I feed my new starter that is made with the rye flour, how do I feed it? If I feed it with all purpose flour won’t all my future loaves have an inconsistent amount of rye in them or would it be too small amount to notice?
I don’t notice a rye taste in my sourdough. The purpose of the rye is to help the starter be stronger. Whole grains can help with that.